Golden Gate Assembly Tool Tutorial
Script
Tutorial for NEB Golden Gate Assembly Tool.
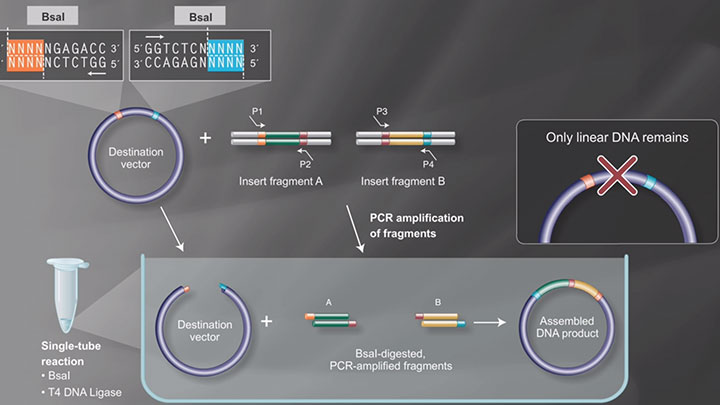
In this video, we will demonstrate how to use the NEB Golden Gate Assembly Tool. As an example, we will build an assembly from five sample inserts or modules using the pGGAselect destination plasmid supplied with our Golden Gate Assembly Kits. The tool will help design PCR primers to make amplicon inserts, check sequences for internal Type IIS restriction enzyme cut sites, and generate a report that shows the assembly graphically, and includes a full construct sequence file.
Begin by selecting the Type IIS restriction enzyme you have chosen for your assembly design from the dropdown menu. Enzymes available from NEB are shown in red. Choose the restriction enzyme that has no internal sites in the DNA sequences to be used in the assembly. If this is not possible, view our video on Golden Gate Domestication for strategies dealing with internal sites. In our example, we will select “BsmBI-v2” and use sequences that have no internal sites.
Add the destination vector. Add the destination vector by clicking on “Add Sequence”. Select “Use Sample Sequences”. Then select “pGGAselect” from the destination vector's dropdown menu. The sequence will appear in the parsed sequence window and the vector name will be shown. If you are loading your own destination vector sequence, you can paste it in manually or load your GenBank, FASTA, or raw sequence file.
You will also have the option of using the sequence or converting it to its reverse complement to fit in the correct orientation in your desired final assembly. Note the destination vector has been identified as your vector and as circular. Next, select “Existing BsmBI-v2 cut sites”. Since pGGAselect already has designed flanking BsaI, BsmBI, and BbsI sites at the assembly site of the plasmid. For other proposed destination plasmids, the tool will warn you if sites are not present or if they are improperly oriented. The graphic should now show the pGGAselect vector backbone. Click on “Add”. Now we will add the first insert. Click on “Add Sequence”. Select “Use Sample Sequences”. Select “Insert 1” from the sample inserts dropdown menu.
The sequence will now appear in the parsed sequence window and the insert name will be shown. Notice the vector and circular identifiers have not been checked as the entire sequence in the sequence window should be the desired insert. Next, select “PCR-generated BsmBI-v2 sites” to automatically build flanking BsmBI sites in the primer designed for your insert PCR. If loading your own insert sequence, you have the option of designating the beginning and end of the desired insert sequence by entering the “Start” and “End base” numbers from your uploaded sequence. You can also generate the reverse complement if this is required for the correct orientation of your building assembly.
If your insert sequence is part of an uploaded plasmid construct, it is important to identify the uploaded sequence as being circular in case your insert spans the beginning of the presumed linear sequence file. For our demonstration, however, we will use the entire sample insert sequences in the appropriate orientation as shown. Click on “Add”. As you can see, the graphic now shows both the pGGAselect vector backbone and the first insert. This button will be disabled if the program detects an internal site in your insert sequence. Add the second, third, fourth, and fifth inserts in a similar way. Repeat the steps above for each fragment you would like to add. In this demonstration, we will add inserts two, three, four, and five.
Always remember to click on “Add” for each added insert. With each addition, the graphic will show the added insert on the map with the order of inserts shown above. After all inserts are added, the graphic shows the pGGAselect vector backbone and all inserts. You have now indicated your chosen destination plasmid vector backbone and the five inserts in the desired order. At this point, you can review your planned assembly. Are the inserts in the desired order? If not, rearrange an insert by selecting it and dragging it to its new position. Check the “Notes” section for any warnings that should be assessed before moving forward. These warnings differ in severity.
Note the strongest warnings indicate issues that could lead to assembly failure. These include self-annealing primers that could generate a Golden Gate active false insert during PCR, an overhang that our T4 DNA ligase fidelity research identifies as leading to poor assembly efficiency, or a discontinuity or lack of a proper overhang between assembly sequences. For more details on warnings, please refer to the “Help” section of the tool. Is the “Estimated ligation fidelity” high enough to ensure assembly success? If not, click on “Optimize” or “Refresh” to receive additional recommendations. Note that further information about junctions is available by selecting any insert in the graphic.
This will bring up a color coded listing of the insert with both its upstream and downstream regions. Also displayed will be the suggested primers for each amplicon insert to be generated by PCR with five prime flanking bases and the chosen Type IIS restriction enzyme recognition site added to each primer. Also listed are the recommended oligonucleotide primers with their length, percent GC, and suggested annealing temperatures. Next, click on the “Project Summary” tab for a full assembly report that will contain all your information. You can export a PDF of the assembly by clicking on “Export summary (PDF)”. To export component fragments, click on ”Export fragments (FASTA)”.
You have the option of listing your suggested primers in an IDT compatible format or a FASTA format. Click on “Export oligos” to generate a text file of the primers. For your assembled sequence, choose the format you prefer by checking the box for a FASTA, GenBank, or Serial Cloner format and click on “Export assembled sequence” to export. Review the assembled color coded sequence for your completed planned assembly. Click “Done”. Other useful options within the assembly tool include the “Preferences” tab, which indicates the ligation fidelity dataset used to generate high-fidelity overhangs for your chosen Type IIS restriction enzyme to direct the assembly, the PCR DNA polymerase or kit used to estimate the annealing temperatures for the generated PCR primers.
NEB recommends the use of the high-fidelity Q5 DNA polymerase to minimize errors generated during PCR for amplicon inserts, but other options are available in the dropdown menu. You can change any of these parameters, just be sure to click “Save Changes” when done. The “Load/Save Project” tab allows you to rename your assembly project if desired. You also have the option to save it to your computer or load it at a later time for further analysis. The “Golden Gate Utilities” tab allows access to the three associated browser-based ligase fidelity web tools. The “View overhang set fidelity” shows the predicted ligation fidelity for your generated overhangs.
The “Get high-fidelity overhang set” uses T4 DNA ligation fidelity data generated from research performed at New England Biolabs to provide lists of overhangs known to ligate by this enzyme with high-fidelity. The “Split sequence for scarless assembly” will examine an uploaded desired full assembly and divide it into inserts based on your stated number of fragments. Please note that for assemblies with greater than 20 fragments, we suggest you use the Ligase Fidelity Tools on our NEBeta tools webpage. The “?” icons indicate further information is available about various steps while using the web tools. We hope you find the assembly web tool useful. And as always, we are available at info@neb.com for any questions.
Related Videos
-

Overview of NEBridge® Tools for Golden Gate Assembly -
Golden Gate Assembly Workflow -

Golden Gate Assembly Domestication Tutorial -

Listen to DAD (Data-optimized Assembly Design) when constructing high-complexity Golden Gate Assembly targets -
NEB® TV Ep. 15 – Applications of Restriction Enzymes